Set up Quota for Linux User
網上札記(部份資料由網上取得)
1 rpm -qa | grep quota
2 vi /etc/fstab
LABEL=/home /home ext3 defaults,usrquota,grpquota 1 2
3 touch /home/aquota.user
4 chmod 600 aquota.user
5 quotacheck -uvg /home
-u 掃描使用者的檔案和目錄的使用情況(會建立aquota.user)
-g 掃描群組掃瞄檔案與目錄的使用情況,會建立 aquota.group
-v 顯示掃瞄過程的資訊;
6 quotaon [-vug] [/mount_point]
-u :針對使用者啟動 quota (aquota.user)
-g :針對群組啟動 quota (aquota.group)
-v :顯示啟動過程的相關訊息;
7 edquota -u myquota1 (樣本)
# 將 myquota1 的限制值複製給其他四個帳號
edquota -p myquota1 -u myquota2
edquota -p myquota1 -u myquota3
edquota -p myquota1 -u myquota4
edquota -p myquota1 -u myquota5
8. 為方便設定QUOTA 可以以GRP QUOTA 去限制用戶限額
edquota -g myquotagrp
9. 睇QUTOA表
repquota
10 測試quota 是否生效
dd if=/dev/zero of=bigfile2 bs=1M count=300
11 如果qouta 滿了 ,會自己出電郵通知用戶
warnquota (這個程式需要人手啟動 ,才會根據用戶紀錄去發出電郵報告
vi /etc/warnquota.conf
# 先找到底下這幾行的設定值:
SUBJECT = NOTE: You are exceeding your allocated disk space limits <==第10行
CC_TO = "root@localhost" <==第11行
MESSAGE = Your disk usage has exceeded the agreed limits\ <==第21行
on this server|Please delete any unnecessary files on following filesystems:|
SIGNATURE = root@localhost <==第25行
# 可以將他改成如下的模樣啊!
SUBJECT = 注意:你在本系統上擁有的檔案容量已經超過最大容許限額
CC_TO = "root@localhost" <==除非你要寄給其他人,否則這個項目可以不改
MESSAGE = 你的磁碟容量已經超過本機的容許限額,|\
請在如下的檔案系統中,刪除不必要的檔案:|
SIGNATURE = 你的系統管理員 (root@localhost)
# 在 MESSAGE 內的 | 代表斷行的意思,反斜線則代表連接下一行;
#自動執行warnquota
vi /etc/cron.daily/warnquota
/usr/sbin/warnquota
# 你沒有看錯!只要這一行,且將執行檔以絕對路徑的方式寫入即可!
[root@www ~]# chmod 755 /etc/cron.daily/warnquota
IT 技術備忘
2011年5月19日 星期四
Samba 設定
Samba 設定
[Database]
comment = Database Directory
path = /var/flexshare/shares/db
valid users = @Database_T,f_share,share
writable = yes
browserable = no
writelist = @Database_T,f_share,share
readlist =
public = yes 公開顯示的目錄/對使用者公開
wins support = yes
wins server = ip
即使writelist 放right , 也要folder 要下放權限
2011年4月18日 星期一
Fail2Ban ( Copy From Internet )
Fail2ban
Fail2ban 是一套以 Python 語言所撰寫的 GPLv2 授權軟體,藉由分析系統紀錄檔,並透過設定過濾條件 (filter) 及動作 (action),當符合我們所設定的過濾條件時,將觸發相對動作來達到自動化反應的效果 (如封鎖來源 IP、寄信通知管理者、查詢來源 IP 資訊等)。因其架構相當彈性,我們可以針對自己的需求,設計不同的過濾條件與動作來達到伺服器防護的功能,或是及時的反應某些異常資訊。常見應用有:
- 阻擋 SSH、FTP 多次嘗試錯誤連線;
- 阻擋特定的瀏覽器或網路爬蟲;
- 提供管理者了解異常伺服器服務要求 (如 apache、bind、postfix、vsftpd、proftpd…)。
Step 0:安裝
- Fedora 使用者
# yum install fail2ban
# vim /etc/yum.repos.d/atrpms.repo
[atrpms]
name=Red Hat Enterprise Linux $releasever - $basearch - ATrpms
baseurl=http://dl.atrpms.net/el$releasever-$basearch/atrpms/stable
gpgkey=http://ATrpms.net/RPM-GPG-KEY.atrpms
gpgcheck=1
enabled=1
# yum install fail2ban
- Debian / Ubuntu 使用者
# apt-get install fail2ban
Step 1:設定檔說明
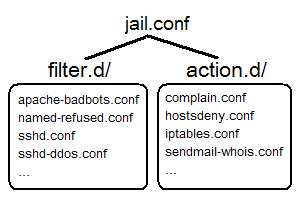
Fail2ban 的設定檔主要有以下三個項目:
jail.(conf|local)
用來設定 jail,即是定義 filter 與 action 的對應關係。filter.d/
用來定義過濾條件 (filter),目錄下已定義多種既有的過濾條件,常見的軟體有 apache、sshd、vsftpd、postfix 等,而常見記錄檔格式也可能為 Syslog、Common Log Format 等。
Step 2:設定範例
我們以 Fedora 用戶為例,首先編輯主要設定檔
 為避免因為套件更新或升級,導致
jail.(conf|local),並設定一些基本資訊。 *.conf 檔案異動,建議將使用者自訂部分寫在 *.local 檔案中。1. 全域設定
# vim /etc/fail2ban/jail.conf (.local)
[DEFAULT]
ignoreip = 127.0.0.1
bantime  = 600
findtime = 600
maxretry = 3
backend  = auto
ignoreip
指定哪些 IP、主機或是網段可以忽略,而不作任何動作。bantime
設定這個主機要被阻擋多久。maxretry
被封鎖前的最大嘗試失敗次數findtime
maxretry 產生後,多少時間內被封鎖。
2. 個別設定
[ssh-iptables]
enabled  = true
filter   = sshd
action   = iptables[name=SSH, port=ssh, protocol=tcp]
           sendmail-whois[name=SSH, dest=root, sender=fail2ban@myhost]
logpath  = /var/log/secure
maxretry = 5
上述例子,我們啟用
ssh-iptables 這個 jail,分析 /var/log/secure 記錄檔,並使用 sshd 這個 filter 來過濾,當符合條件且達最大重試次數 5 次時,便執行 iptables 與 sendmail-whois 兩個 action。- sshd (filter) 設定檔為
/etc/fail2ban/filter.d/sshd.conf - iptables (action) 設定檔為
/etc/fail2ban/action.d/iptables.conf - sendmail-whois (action) 設定檔為
/etc/fail2ban/action.d/sendmail-whois.conf
Step 2:啟動或停止 Fail2ban
- Fedora / CentOS / RedHat 使用者
# service fail2ban start
# service fail2ban stop
- Debian / Ubuntu 使用者
# /etc/init.d/fail2ban start
# /etc/init.d/fail2ban stop
Step 3:觀察 Fail2ban 狀態
- 觀察目前啟動哪些 jail,下面例子可看到有
apache-notexist、apache-badbots、ssh-iptables三個 jail 啟用中。
# fail2ban-client status
Status
|- Number of jail:      3
`- Jail list:           apache-notexist, apache-badbots, ssh-iptables
- 觀察特定 jail 的內容,下面例子可觀察到
apache-notexist這個 jail,是分析/var/log/httpd/error_log記錄檔,累計有 7 次失敗,且已有 1 個 IP 被阻擋了。
# fail2ban-client status apache-notexist
Status for the jail: apache-notexist
|- filter
|  |- File list:        /var/log/httpd/error_log
|  |- Currently failed: 1
|  `- Total failed:     7
`- action
   |- Currently banned: 1
   |  `- IP list:       140.114.xxx.xxx
   `- Total banned:     1
進階設定說明
filter 的設定
 欲定義過濾條件,可以編輯
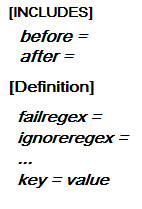
 /etc/fail2ban/filter.d/*.(conf|local) 目錄下的檔案,如「sshd.conf」,後續於 jail.conf 中使用該 filter 則名為sshd。每個 filter 設定檔中可分為以下幾個主要部分:INCLUDES
可用來載入其他檔案的設定值,預設會自動引用.local檔案。before
於設定檔載入前先引用此檔案。after
於設定檔載入後再引用此檔案。
Definition
action 的設定
 定義動作內容,可以編輯
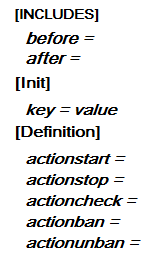
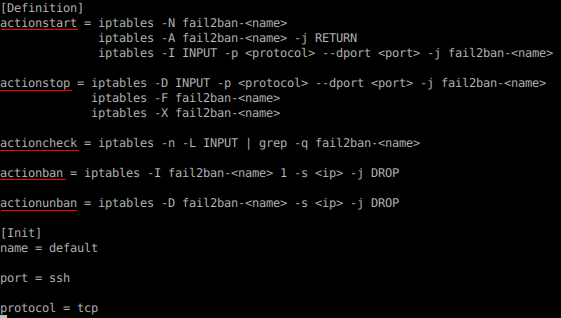
 /etc/fail2ban/action.d/*.(conf|local) 目錄下的檔案,如「iptables.conf」,後續於 jail.conf 中使用該 action 則名為 iptables。每個 action 設定檔中可分為以下幾個主要部分:INCLUDES
可用來載入其他檔案的設定值,預設可自動引用.local檔案。Init
可用來預先定義變數,供 Definition 中使用。Definitionactionstart:定義當 Fail2ban 啟動時,所要執行的指令,如初使化設定。actionstop:定義當 Fail2ban 停止時,所要執行的指令。actionban:定義要阻擋某個 IP 時,所要執行的指令。actionunban:定義要取消阻擋某個 IP 時,所要執行的指令。
實際應用
- 阻擋嘗試登入的行為,如 SSH 遠端連線、FTP、Web 登入介面或是自行設計的帳號登入系統,皆可設定最大嘗試登入次數,透過阻擋來源,避免有心人士暴力猜測帳號及密碼。
- 有些攻擊行為會先找尋網站上是否有安裝特定管理工具、論壇、部落格,如 phpMyAdmin、phpBB、Drupal、WordPress 等,當這些程式存在漏洞或缺陷時,往往會成為有心人士的利用工具。而當 Apache 的系統紀錄檔中連續出現一大堆的「404 Not Found」或「403 Forbidden」的紀錄時,此時或許是有心人士正在暴力找尋是否有安裝上述特定軟體。
2011年2月8日 星期二
Block an IP Address on My Linux server
How Do I Block an IP Address on My Linux server?
How do I block an IP address or subnet under Linux operating system?
In order to block an IP on your Linux server you need to use iptables tools (administration tool for IPv4 packet filtering and NAT) and netfilter firewall. First you need to log into shell as root user. To block an IP address you need to type the iptables command as follows:
Syntax to block an IP address under Linux
For example, if you wish to block an ip address 65.55.44.100 for whatever reason then type the command as follows:
# iptables -A INPUT -s 65.55.44.100 -j DROP
If you have IP tables firewall script, add the above rule to your script.
If you just want to block access to one port from an ip 65.55.44.100 to port 25 then type command:
# iptables -A INPUT -s 65.55.44.100 -p tcp --destination-port 25 -j DROP
The above rule will drop all packets coming from IP 65.55.44.100 to port mail server port 25.
CentOS / RHEL / Fedora Block An IP And Save It To Config File
Type the following two command:
# iptables -A INPUT -s 65.55.44.100 -j DROP
# service iptables save
How Do I Unblock An IP Address?
Use the following syntax (the -d options deletes the rule from table):
# iptables -D INPUT -s xx.xxx.xx.xx -j DROP
# iptables -D INPUT -s 65.55.44.100 -j DROP
# service iptables save
Allow specify port using iptables
/sbin/iptables -I INPUT -p tcp --dport 80 -j ACCEPT
# 儲存設定
/etc/rc.d/init.d/iptables save
# 重新啟動防火牆
/etc/init.d/iptables restart
Copy from internet
2011年2月6日 星期日
奪取操作角式
奪取操作角式
1 cmd : ntdsutil
2 ntdsutil:roles
3 fsmo maintenance:connections
4 server connections:connect to server dc2.sayms.com
5 server connections:quit
6 fsmo maintenance:seize pdc
ps
seize schema master
seize domain naming master
seize RID master
seize infrastructure master
將現有的windows2000 或 server 2003 forest 升級至srv2008
將現有的windows2000 或 server 2003 forest 升級至srv2008
1 . 所有server 2000 網域控制站必須升級至sp4
2 . domain functional level 必須是2000 native mode
3 . 先找出schema master 和 infrastructure master
4 . 開始執行 – 輸入 regsvr32 schmmgmt.dll 找出schema master
5 . 去mmc 新增Active Directory 架構
6 . infrastructure master 可以於active directory and user 找到
7 . 放入srv2008 光碟 於schema master
8 . 於command prompt 輸入光碟機代號
9 . cd \sources\adprep
10 . adprep /forestprep \\ C + enter
11 放入srv2008 光碟 於infrastructure master
12 cd \sources\adprep
13 adprep /domainprep /gpprep
Ps adprep /domainprep /gpprep 會將sysvol 資料夾內的gpo 權限設定copy 到所有其他網域控制站 , 因為如果網路內有許多網域控制站或gpo 輸多的話 , 這個copy 動作會佔較多網路頻寬,影響網絡效能, 所以建議先執行不會copy gpo 權限的指令
Step 1 adprep /domainprep
step 2 adprep /domainprep /gpprep
14
利用 安裝媒體來安裝額外網域控制器
利用 安裝媒體來安裝額外網域控制器
製作安裝媒體
1 於其中一台Domain Controller 輸入 ntdsutil
2 輸入 activate instance NTDS // 代表把AD 資料庫設定為使用中
3 ntdsutil:ifm
4 ifm:create full c:\InstallationMedia
5 ifm:quit
6 ntdsutil:quit
7 將整個C:/InstallationMedia 資料夾內的所有資料copy 至usb /光碟或share drive
使用安裝媒體建立額外網域控制器
1 dcpromo.exe \ReplicationSourcePath:C:\InstallationMedia
訂閱:
文章 (Atom)


